Cork Board Vision Board: Why Pinning Beats Gluing (and How to Set One Up)
A cork board vision board uses a wall-mounted cork tile or framed cork board instead of poster paper as the base, so every image is pinned (not glued) and can be swapped, moved, or replaced any week without rebuilding the whole board. The cork is what turns a one-shot poster into a living board.
You made a poster-board vision board last January. It was beautiful for six weeks. Then the savings goal shifted up by $1,200 because the rent went up, the travel goal dropped because of the dentist, and the gym photo got embarrassing once you actually started going. You sat there with a craft knife trying to cut out the old images without tearing the board, gave up, and the whole poster ended up in the recycling by April. The next one needed a different surface.
A cork board solves the part of vision boards that gets you on the second one: goals change. A pinned image lifts off in one second and a new image takes its place. The board adapts to a moving target, which is what a year actually looks like.
The short version: Use cork for any vision board you plan to keep for more than a season. Pick a 24×36-inch frame for a single board or 12×18 tiles for a flexible wall grid. Push pins for paper, T-pins for layered cards, washi loops if you want to skip pinholes entirely. Mount with Command strips if the wall is a rental wall, with two screws if it is not. Refresh quarterly, replace the whole content yearly. A poster freezes the year you made it; a cork board carries the year as it changes.
What cork gives you that poster board does not
Two practical things separate cork from poster.
The first is swap-ability. Push the pin in, pull it out, swap the image, push the pin back, total reset under ninety seconds. Glue makes you commit; cork lets you experiment. The second is layering. Cork holds up to about a quarter inch of stacked paper without straining, which means a small magazine cutting can live under a polaroid under a quote card without anything falling. Poster board, even with the strongest glue, peels at the edges within three months under that kind of stack.
A third quiet benefit: cork survives kid hands, cat tails, and the slow tug of humidity. Poster boards warp in a steamy bathroom or curl in a sunny window. Cork does neither.
If you are deciding between cork and poster for your first board, the vision board supplies list covers the full comparison plus pricing.
Types of cork board (and which one to pick)
There are basically four kinds of cork board you will see at the store. Each suits a different setup.
1. Framed cork board (the apartment-friendly default)
A wood-framed cork rectangle, usually 18×24 or 24×36 inches, sold at office stores and Target for between twelve and twenty-five dollars. The frame holds the cork rigid and gives the wall a finished look, which is the reason this kind shows up most often in vision board photos online.
Best for: the central wall in a bedroom or office, a single all-in-one board, and renters who want the cork to read as decor rather than as a craft project. Risk: the frame edges eat about an inch of usable cork on each side, so a 24×36 frame is really a 22×34 working surface. Measure inside the frame, not the outside, before you start.
2. Cork tile sets (the flexible grid)
Cork tiles in 12×12 or 12×18 inches, sold four to a pack at hardware and craft stores. The whole pack runs around twelve dollars. Hang them in a grid (a 3×2 layout of 12×12 tiles is the most common one people post on Pinterest) and the board becomes a 36×24 surface made of independent panels.
The real reason to pick tiles over a single frame is that each tile can hold a different category. One tile for career goals, one for travel, one for home, one for relationships. You can move whole tiles around, swap a stale category out without touching the others, and the visual grouping does the work that placement rules do on a single-board setup. Risk: the seams between tiles are visible if your wall lighting is harsh; soft side lighting makes them disappear.
3. Roll cork (the giant wall board)
Cork sold by the foot off a roll, usually 24 inches wide, at hardware stores. You cut it to size, glue or staple it to the wall, and end up with a board that runs as large as your wall allows. People do six-foot-wide setups behind a desk this way.
Best for: home offices, dedicated craft rooms, and anyone with a long bare wall. The price-per-square-foot is the lowest of the four options. Risk: roll cork is rentable-unfriendly. It needs adhesive or staples to hold, and removing it pulls paint. Skip this kind in any rental where you care about the deposit, and the aesthetic vision board guide covers framed alternatives that read as intentional on a small wall.
4. Self-stick cork tiles (the rental hack)
Adhesive-backed cork tiles, usually 12×12 inches, sold in packs of four. Peel the backing, press them to the wall, and you have a vision board surface in five minutes without screws or strips. Around fifteen dollars for four tiles.
Best for: short leases, mid-year board changes, and walls where you want the board to come down clean at move-out. The adhesive is reversible on most painted walls if you remove the tiles within a year. Risk: the adhesive ages. Tiles older than eighteen months can lift their own corners on a hot wall, and the residue gets stickier the longer they stay up. Set a calendar note for fifteen months and pull the tiles down with a hair dryer before that lift starts.
How to mount a cork vision board without ruining a wall
Two mounting methods cover almost every rental situation. The third is for owned walls only.
For a framed cork board (kind 1) on a rental wall, Command strips rated for the weight of the frame plus four pounds of accumulated pinned material is the safe move. A 24×36 frame typically weighs about three pounds; pick the eight-pound strip rating to leave headroom. Press the strips on cleanly, follow the forty-second wait time in the Command instructions, and the board holds for years without leaving a mark.
For cork tiles (kind 2) on a rental wall, the self-stick versions (kind 4) skip the mounting step. For non-adhesive tiles, small Command picture-hanging strips (one per tile, lower edge centered) hold individual tiles flush to the wall.
For owned walls, two small drywall screws through the frame back or a French cleat under the frame both work, and both look cleaner than strips. The board will outlast the wall paint.
What you actually need to set one up
Real starter kit is six things, all of which cost under thirty dollars combined at a regular office store or Target.
- The cork itself. Framed board or four tiles, depending on which kind above you picked.
- Push pins or T-pins. A pack of fifty in a neutral color (matte black, brass, white) so the pin colors do not fight the images.
- Command strips or screws. Pick by wall type, see the mounting section above.
- Scissors and an X-Acto knife. Magazines need both. Scissors for fast cuts, the knife for clean rectangles.
- A pencil and a ruler. For light placement marks on the cork before you commit.
- A small box for retired images. A shoebox works. As you swap images out across the year, the box collects them. Some people end the year by paging through the box; others just recycle.
The full materials list has source recommendations for ephemera, magazines, and printable images if you want to expand past the starter.
Setting up the board (the first sit-down)
A cork vision board takes about an hour to set up the first time. Plan for two sessions if your image stack is large.
The first session is curation. Lay every image, quote card, and printable you have on the floor or the table. Pick the anchor image (the one that, if everything else fell off the board, you would still want to look at). Set it aside. Pick six to ten supporting images that share the anchor’s palette and mood. Set them aside. Recycle everything else, even if it took an hour to find. Twelve well-chosen images beat forty mediocre ones every year.
The second session is placement. Light pencil marks on the cork to show the anchor’s center. Pin the anchor first. Pin the supporting images radiating out from it, leaving a quarter to half an inch of space between each. Add one to three written goals in your own handwriting on small index cards, pinned at eye level. Step back six feet, squint, and see if any image jumps out wrong. If it does, repin it or remove it. The goal-setting vision board guide covers what to write on the goal cards in detail.
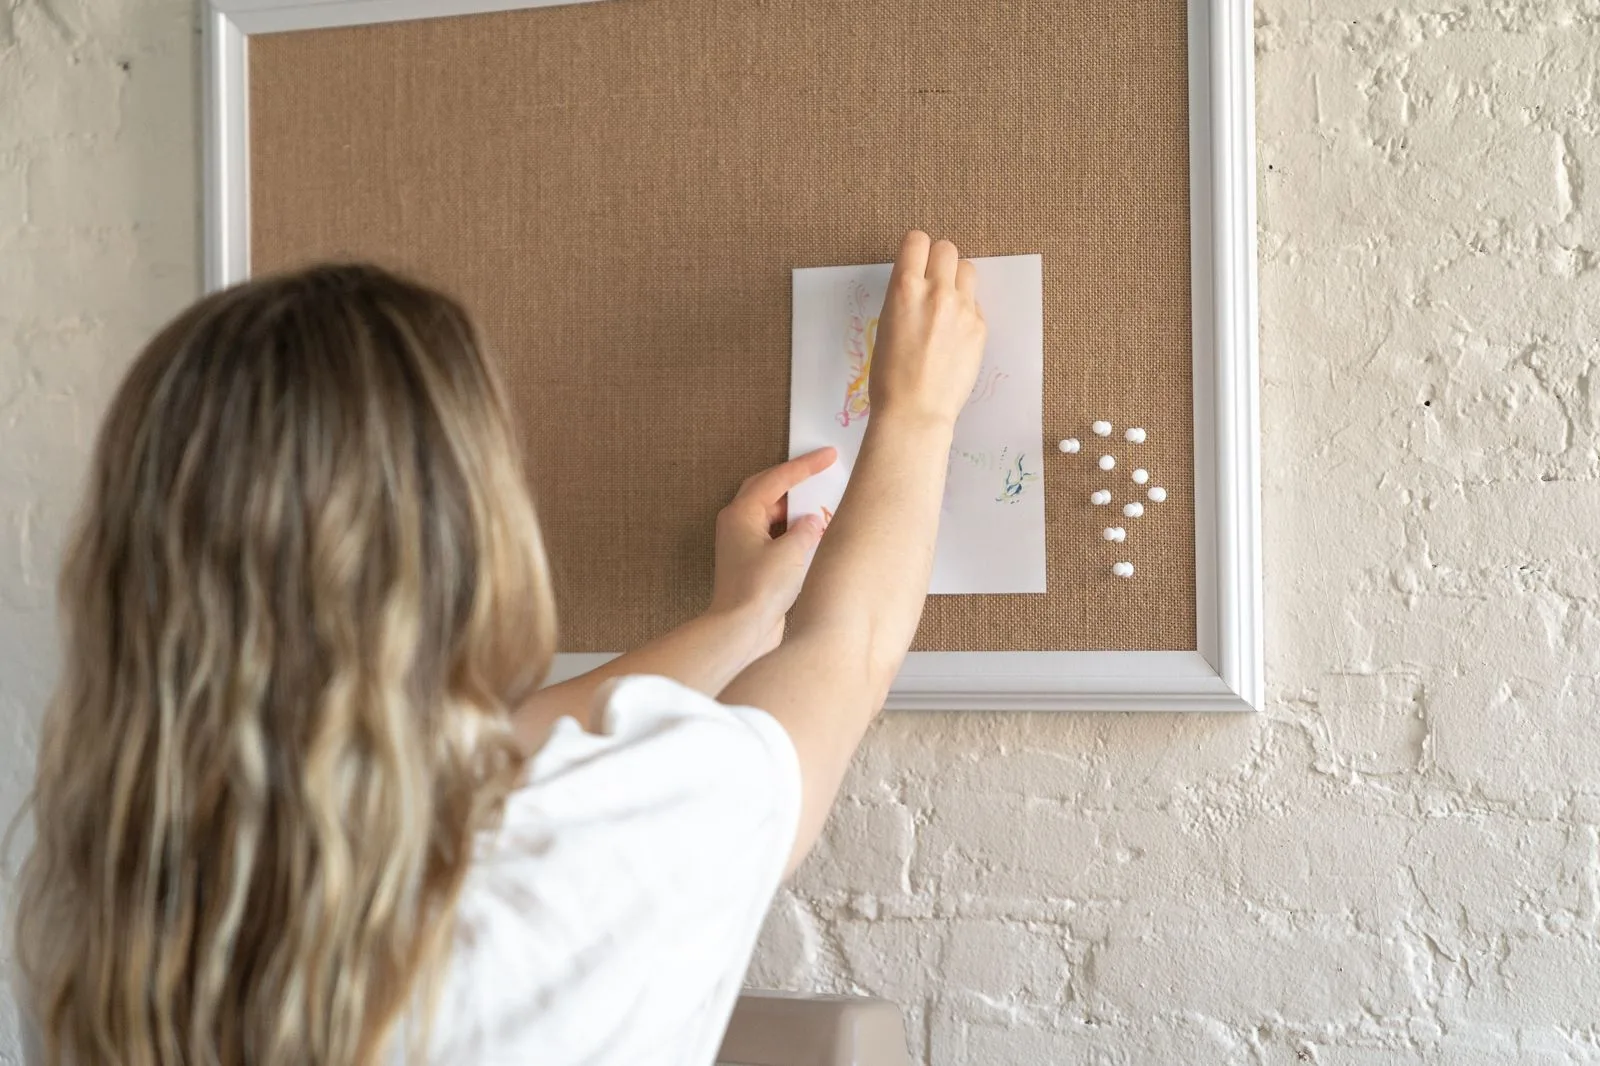
A small trick for cork: Pin paper images at the top corners only, not the center. Top-corner pinning lets you lift each image to peek at what’s underneath, which matters because in three months you will absolutely want to move one image and the pin holes from a full four-corner pinning are visible later.
Maintaining a cork vision board
Three small habits keep it from going stale.
- Sunday glance. Walk past the board on Sunday morning, look at it for thirty seconds, walk away. Half a minute, no journaling.
- Monthly add-or-remove. Once a month, swap one image for a new one or remove one that has stopped pulling weight. Five minutes maximum.
- Quarterly real edit. Take down everything that no longer matches the year. Add the new things that did not exist in January. Reset the anchor if it has shifted. About twenty minutes per quarter.
The retired-image box fills up across the year. In December, look through it, keep three or four that meant something, recycle the rest.
Common cork vision board mistakes
Five things show up on almost every chaotic cork board. Each has a five-minute fix.
- Overcrowding. Cork has more surface than poster board, which tempts people to fill every inch. Twelve images is the sweet spot; twenty is the warning line; thirty is a cluttered corkboard you stop noticing.
- Mismatched pin colors. Bright neon pins in the corners of every image read busier than the images themselves. Pick one neutral pin color and stay with it.
- No anchor. Pinning without a clear focal image means the eye lands nowhere on the board. Anchor first, supporting images second.
- Treating it like a bulletin board. Receipts, takeout menus, and reminder Post-its do not belong on a vision board. They belong on a separate kitchen corkboard. Keep the vision board for the year, not for the week.
- Forgetting it exists. A board hung in a back hallway gets ignored in three weeks. Mount it on a wall you actually walk past every day, even if the lighting is imperfect.
When poster board is still the better pick
Two cases. The first is a one-shot board built around a single event with a fixed end: a wedding vision board, a renovation board, a “first year in this city” board. Committing to one moment is the point, and cork’s whole flexibility advantage stops mattering. The second is a sub-ten-dollar budget. Poster runs around three dollars; a cork tile set starts near twelve. For a first board on a tight budget, poster does the job. Everything else, cork.
The vision board kit roundup covers cork-included starter kits if you want everything in one box, and the supplies list has standalone cork board recommendations.
Frequently asked questions about cork vision boards
What size cork board is best for a vision board?
24×36 inches for a wall-mounted single board, or four 12×12 tiles in a 2×2 grid for a flexible wall layout. Smaller than 18×24 starts feeling cramped once you have ten or more images; larger than 36×48 takes effort to fill and tends to look thin.
Do you need to seal a cork board for a vision board?
No. Cork holds up without sealing for vision board use. Sealing matters for cork floors and cork in damp rooms; a vision board hung in a normal bedroom or office stays good for years untreated.
Can you use a cork board vision board for digital images?
Print the images on regular printer paper or thicker card and pin them just like magazine cuts. Most modern vision boards are a mix of print-outs (from Pinterest, screenshots, Instagram saves) and physical clippings, and cork holds both equally. Run the prints on a matte setting if you can, glossy prints reflect light and read flat on the wall.
How long does a cork board vision board last?
The cork itself lasts ten-plus years. The content lasts about a year before it needs a full refresh, with quarterly small edits in between. A single cork board can carry a decade of yearly vision boards if you reset the content every January.
Is cork board safer for rental walls than poster board with adhesive?
Yes, when mounted with Command strips. Cork plus Command rated for the right weight leaves no mark on most painted walls and comes down clean at move-out. Adhesive poster board (like peel-and-stick) is harder to remove cleanly and pulls paint on textured walls more often than Command does.
The next bare patch of wall you have can be a working vision board by the end of this weekend. Pick the cork kind that fits the wall (framed, tile, roll, or self-stick), mount it with the method that fits the lease, pin twelve images you actually want to look at, and start the year with a board that can adapt as the year does. Walk past it Sunday morning and the goals are still right there, just where you left them.


")

")
")